KR-style Guitar Kit Assembly Manual
This manual has a new home in the Guitar Kit World Community.

The newest version of this guide lives on our community forum, where you can ask a question under any step and get answers from builders and staff: How to Build a Superstrat Electric Guitar Kit
This guide provides step-by-step instructions to build a KR-style Guitar using a kit. Even if you have never built before, you can learn how to get started by reading this tutorial.

There’s nothing more satisfying than playing a guitar you have put together yourself!
Project Tools and Consumables
Before we get started check the list below and ensure you have the necessary tools and consumables required to complete the project
Tools
- Electric jigsaw or coping saw (*If shaping the headstock)
- Steel ruler (at least 40 cm)
- Hard sanding block
- Center punch (or similar tool for marking hole locations)
- Electric drill and assorted drill bits
- Large and small screwdrivers (phillips head and flat head)
- Pliers (needle nose preferably)
- Soldering iron
Consumables
- Disposable gloves
- Titebond, PVA, or similar wood glue (*set neck guitar)
- Small paintbrush
- Wood grain filler (If open grain timber such as Mahogany or Oak)
- Sandpaper. Various grades, from 120 up to 1500 (*depends on finish)
- Finishing supplies. (This depends on your choice of finish)
- Painters masking tape
- Assortment of clean rags and paper towel
- Denatured alcohol (or cleaning product with degreasing ability)
- 0000 fine grade steel wool
- Solder (and sponge for cleaning tip of iron)
- Container for storing finishing supplies.
Next, check that all parts have been included.
Parts List
Below are the parts you will find included in your packaging to complete a Hollow Body Guitar.
- 1 x Prepped KR-style guitar body
- 1 x Completed neck
- 2 x Strap buttons
- 6 x inline tuners
- 1 x Double Locking Tremolo /Tune-O-Matic w/ stopbar
- 1 x volume
- 1 x Input jack
- 1 x Cable and hex wrench (for adjusting truss rod)
- 1 x volume knob
- Assorted screws and washers
Safety Precautions
To complete your guitar kit safely, also ensure you have the following on hand, and a well ventilated work space to work in.
Protective eyewear
Use protective safety glasses or a genuine face shield, not regular prescription, reading, or sunglasses.
Disposable gloves
Use disposable gloves if applying stains or oil finishes directly to the guitar.
Masks
Use an N95 rated dust mask for sanding and an R95 rated particle mask for finishing. If using water based finishing products an N95 dust mask may suffice for both sanding and finishing, but be sure to check the finishing suppliers recommendations first. Paint fumes are dangerous.
A well ventilated work area
Ensure your work space is well ventilated, especially when finishing to prevent a build up of potentially toxic fumes.
What to expect when you buy a KR-style Guitar Kit
Making your Guitar Kit play & Sound Great
There are four stages to building a great kit guitar, these are:
1. Preparation and finishing
The finished surface appearance of your guitar e.g. staining, painting, or applying a hand rubbed oil finish.
2. Hardware Installation
Fitting the tuners, strap buttons, bridge, and pickups.
3. Connecting the electronics
Connecting the pickups to the input jack, and incorporating a pickup selector and volume and tone potentiometers.
4. Final Setup
Adjusting the neck relief, action, intonation and pickup height.
We’ll cover each of these below, starting with preparation and finishing.
1. Preparation and finishing
Once unboxed, carefully inspect the body and neck under good light.

Identify problem areas, as these should be addressed early on before commencing the project.
This includes large dents that require filling, deep scratches that require sanding and glue residue on the surface of the guitar that will prevent your finish from being absorbed evenly.
Glue stains are only a potential issue for guitars with binding, and/or a veneer top.
Once you have identified problem areas you can begin prep sanding the guitar.

Start by sanding the entire body using 180 grit sandpaper
Follow that up with 240 grit paper. If you are applying a stain directly to the raw wood sand up to 400 grit, but sanding any smoother than this may begin to affect how well the stain is absorbed.
Once you have completed sanding up to 240 grit, wipe a small amount of moisture on the surface of the guitar. Using denatured alcohol is a good option here as it evaporates before it is absorbed into the timber, but water will also raise the grain of the timber which can then be sanded flat. Generally grain will only raise once, so you can be confident by taking care of it now, you won’t have any problems during the finishing process.
Dry Fitting the Neck
You should also check the neck fit. Most hollow body guitars are set necks and would sometimes have a tighter neck pocket than a bolt on. it’s important to dry fit the neck and check how well it fits the neck pocket, along with neck alignment, neck angle and scale length.
Insert the Neck
First push the heel gently into the back of the neck pocket, then push the neck down flat.
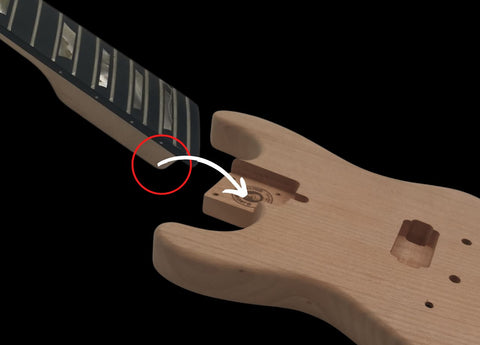
This reduces the risk of chipping the thin edges of the neck pocket before the neck has been installed.
Check the scale length
You can check the location of your bridge with regard to scale length by loosely installing the bridge and measuring the distance from the edge of the nut closest to the fretboard and the middle of the 12th fret and then doubling that number.
If your scale length appears out by a few mm, keep in mind the individual saddles can be adjusted forward or back via the intonation adjustment screws.
Check the neck fit
The neck, once inserted into the neck pocket, should have very little sideways movement. If there is a gap on either side of the neck, you may need to shim the neck by cutting small sections of scrap wood with a craft knife and gluing these to the sides of the neck pocket. Otherwise smaller gaps can be filled prior to finishing using a filler.
Check the neck angle
Run a steel ruler along the fretboard and over the bridge. The steel ruler should sit just above the saddles on the bridge when the bridge is sitting flat against the body.

Recommended: Fixing Cracks & Loose Neck Joints Caused by Humidity
2. Hardware Installation
This would probably the most exciting part as your guitar is slowly coming into life. We have prepared videos to show you exactly how the hardware is installed. That includes fitting the tuners, strap buttons, bridge, and pickups. Installing the hardware on your kit is similar for all guitars so you could refer to these videos.
How to install hardware on a PR-style kit
How to install hardware on a JE-style kit.
How to install hardware on Junior guitar kit
How to install hardware on X-style guitar kit
How to install hardware on T-style guitar kit
Pilot Holes
Drill pilot holes for all screws used on the body and neck of the guitar.
The small screws used for securing your tuners for example are small, fragile and easily stripped.
Whenever installing hardware:
- Use masking tape on the guitar to mark the location of the hole using a pen (pencils usually don’t result in sharp lines on masking tape).
- Mark the location of the hole making an indentation in the wood through the masking tape using a hole punch or similar tool.
- Decide on the correct size drill bit (⅔ thickness of the screw) and mark the drill bit depth using a small piece of masking tape at approximately 2/3 the depth of the screw to be installed.
- Always aim to drill your holes straight. If you have a drill press this is preferred.
- Use a countersink drill bit (or similar) to chamfer the edges of any holes in the body of the guitar, especially if painted using a solid color finish, to prevent chipping.
You may want to drill less than ⅓ depth on less dense timbers such as Mahogany and Basswood.
3. Connecting the electronics

If you haven’t soldered before you’re going to need a soldering iron, solder, and a damp sponge to clean the tip of your iron. I’d also recommend practicing before committing solder to your electrical components.
Soldering
Most entry level soldering irons will do the job, and your kit will come with more than enough solder.

Be careful when soldering. Solder won’t melt until it reaches 185°C (365°F) and soldering irons get very hot, up to 392°-896° F in some cases.
When soldering there are two key areas to keep in mind.
1. Tinning
Tin your soldering iron and the components you are connecting to. Tinning refers to maintaining a light coating of solder over the tip of your soldering iron and prevents the iron tip from oxidizing.
2. Preheating
Soldering is really about transferring heat. The lug or component you are connecting to should be preheated so the solder is drawn to it rather than staying on the already hot iron.
4. Final Setup
The last stage of our project is setting up the guitar. This is an important step that makes all the difference with regard to playability and tone. Our final setup will consist of four key areas:
I’ll provide a basic overview of each below. Also, keep in mind the guitar should be tuned to concert pitch and checked regularly during the process to ensure the correct amount of tension is on the neck as adjustments are made.
You may also want to revisit aspects of your setup once you have had time to play the guitar and have identified problems e.g. fret buzz or intonation issues.
Adjusting neck relief
The ideal guitar neck is one that has a small amount of inward bow or relief to provide clearance for the strings when vibrating. A neck that is too straight will very likely run into problems with fret buzz.
You can measure the straightness of the neck using a steel ruler. I prefer to hold down the first and last fret and then tap the 12th fret lightly of the low E string. If the string is already sitting hard against the fret more relief is required. If sitting well above the fret, the amount of relief can be reduced.
To adjust the amount of relief, adjust the truss rod using the hey key included in your packaging. Turn counter clockwise to loosen the truss rod which will introduce more relief. Turn clockwise to flatten the neck further.

Remember to only make incremental changes of ⅛th to a ¼ turn each time and make sure the guitar is tuned to concert pitch so the correct amount of tension from the strings is placed on the neck. Be sure to continue to check your tuning through the entire setup process.
Adjusting the action
Action refers to the height of the strings from the fretboard of the guitar. This is usually measured from the top of the 12th fret to the underside of the low E string.

A good starting point if unsure is 2.4mm on the low E side and 1.6mm on the high E side, taking into account the different string gauges. Make sure the guitar is in tune before checking and making adjustments.
Action is adjusted at the bridge. Taking the small alum key in your packaging, turn the individual saddle posts counter clockwise to lower the individual saddle posts or clockwise to raise the action. 
Intonating the DIY guitar
Intonation, in essence means, is the guitar in tune with itself. You can check this by tuning to standard tuning and then checking the strings at the 12th fret (an octave up from the open string). If the pitch is sharp you will need to lengthen the string length. If flat you will need to shorten it.
As mentioned earlier. Your scale length is not a precise measurement as there is some compensation required for the additional mass of the heavier bass strings. This is also why most bridges on electric guitar are angled away from the body of the guitar toward the bass strings.
To lengthen the string, turn the intonation adjustment screws at the back of the saddle counter clockwise. To shorten turn them clockwise. Make sure the guitar is in tune before checking and adjusting.
Adjusting pickup height
Lastly, we’ll check and adjust the pickup height. Much like string action, the height of your pickups is mostly subjective and will depend on what you are hearing.

You’ll need to match the height for both to keep the saddle balanced on the bridge.
But, if unsure a good starting point is 2.4mm from the top of the magnetic pole piece to the underside of the string. However, this should be measured when pressing down the last fret of the guitar.
To adjust the height of the pickups, adjust the mounting screws on the outside of the pickup surround.
Recommended: How High Should my Pickups Be?
Congratulations on finishing the build!
Here's an awesome video you could enjoy! Follow Addicted To Gear on Youtube.
Showcase your DIY guitar here!
Would you like to showcase your DIY guitar?
We would love to share pictures of your DIY guitar and your guitar building skills on Guitar Kit World. To feature your DIY project upload images & videos of your guitar to social media and tag us (@guitarkits on instagram).