“What kind of guitar is that? Actually, I made it myself”
There’s no better feeling than completing a beautiful custom DIY guitar kit, or telling a curious friend that you actually made it yourself. Knowing this is an instrument that you have put together with your own two hands makes it a guitar like no other.
But, there are a couple of things you should be on the lookout for after assembly, prior to finishing your new guitar that in some cases can be the difference between a guitar that you love and a guitar that just turned out OK.
In the following article we’re going to take a closer look at one of the most common of these, excess glue on your guitar kit.
Why guitar kits may have glue residue
Guitar kits will occasionally come with excess glue on the body. This is mostly due to the glue used to hold the binding in place along with the veneer top. This creates a problem when staining as the glue permeates the timber preventing the stain from being absorbed, which can result in an uneven finish.
The glue used is a type of PVA glue and as such is best removed manually, unlike Cyanoacrylate glues, or CA glues (e.g. superglue) that are typically best removed using a solvent.
While it can be tempting to try using a solvent anyway, I'd recommend against it, as this may:
Cause the glue to be absorbed further into the timber
Weaken the glue holding the binding or veneer in place
And/or damage the binding.
But all is not lost, there are a few ways to address this problem, however, the location of the glue will dictate the best course of action.
Keep in mind, in some cases you may discover glue near the center line of the bookmatched veneer also, and if you are fortunate your hardware may cover the affected area, in which case you won’t need to follow the steps outlined below.
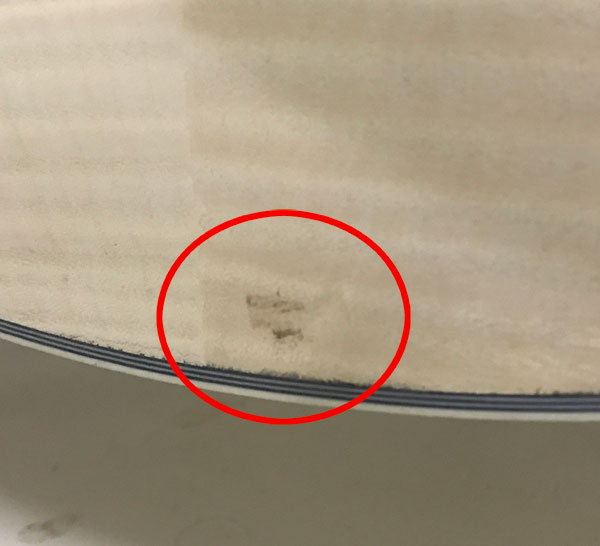
Excess Glue Around The Binding
If excess glue is discovered on the body of the guitar (e.g. not the veneer) the best option for removal is to heat, wipe, scrape or sand the glue away.
Combination heat and moisture
I’d recommend firstly using a combination of heat and moisture.
Apply warm/hot water to a clean rag and try to manually wipe the glue away.
If this is unsuccessful try using additional heat e.g. a heat gun or hair dryer on a low setting and then once more try to remove the glue using a clean rag.
Use a scraper
If this method doesn’t work move on to a scraper e.g. a furniture scraper or sufficiently sharp edged instrument e.g. scalpel blade and try to manually remove the excess glue. Using a longer blade can be useful as there is generally enough flexibility to bend the blade to match the contours of the guitar, making scraping an uneven area much less challenging.
Sandpaper
If scraping doesn’t do the trick, try sanding the excess glue away using a medium grit sandpaper e.g. 120+ grit. Don’t waste your time with anything under 320 grit as this will take some time.
Using sandpaper will normally remove the glue fairly quickly, however be sure to follow up your initial sanding with finer grades of paper, working your way up until the scratch marks are no longer visible and the area the glue has been removed from closely resembles the rest of the body.
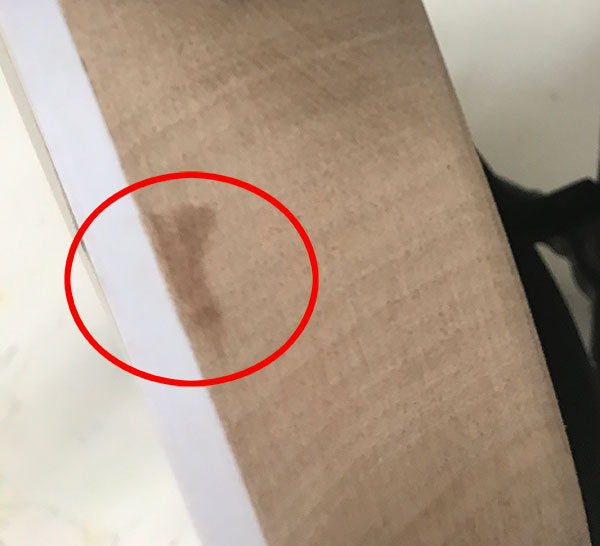
Excess Glue On The Veneer Of The Kit
If you discover excess glue on the veneer of your guitar this is likely due to the glue bleeding through from the underside of the veneer, or if near the binding (as in the image above) is excess glue from the binding itself.
Because the glue is on the veneer this becomes a more complicated issue, and rules out using excessive heat to dissolve and wipe the glue away as this could affect the glue on the underside of the veneer or cause the veneer to dry out and crack.
Reduced heat and moisture
You can try using a combination of heat and moisture but you will need to be far more conservative with the amounts used to avoid saturating the veneer.
Start by only lightly dampening a clean rag with warm water and try to wipe the excess glue away. Take your time, doing it this way won’t remove the glue quickly.
If however this doesn’t appear to be working after several minutes try applying gentle heat using a hair dryer and attempt to remove again. If this doesn’t appear to be working, avoid adding more moisture or heat to the veneer and move on to the next option, scraping and/or sanding.
What to do if you cause the veneer to bubble?
Excess moisture will cause the veneer to bubble, so the best course of action is to avoid this happening in the first place by not saturating the top. If this has already occurred don't despair the top can be salvaged by following the steps outlined below:
Using a heat gun or hair dryer apply a combination of heat and a small amount of moisture to prevent the veneer from frying out and cracking. *you could also use a steam iron over a damp cloth, but be sure not to use too much moisture and don’t let the iron stay in the one place for too long.
Using a sharp blade cut a small slit into the raised area.
Inject a small amount of PVA glue into the slit and spread as evenly as possible using a small paintbrush.
Place a weight on the affected area making sure it won’t stick to the guitar body due to excess glue and leave sit for 24 hours or follow the recommendations of the manufacturer.
Scraping and Sanding
Speaking from experience it can be incredibly frustrating sanding through a veneer top on a new guitar kit.
Unlike the much thicker maple cap you might expect to see on a Gibson Les Paul® which is matched to the mahogany body not only for aesthetics but also to provide better articulation veneers are used for decorative purposes only and are usually quite thin e.g. 1-3mm in some areas.
Because they are quite thin, aggressive sanding or scraping is best avoided. In this case the next best option is to reduce the amount of force used if scraping or use a finer grade sandpaper e.g. 320+ grit and sand lightly, carefully checking your work to avoid sanding through the veneer.
Keep in mind if the glue has bled from the underside of the veneer this may not achieve a result, in which case you are best advised to stop sanding to avoid the possibility of a sand through.
Sealing and Staining
If none of the methods mentioned above seem to help you have two options. Painting the guitar a solid color or sealing and staining.
Most people order a veneer top for the decorative grain pattern e.g. spalted, flamed, or quilted maple, so the top is usually given a semi-transparent finish to highlight the grain. Using a solid color obviously covers the decorative top and as such should be considered a last resort.
However, it is possible to stain the guitar after using a clear sealer coat. Although in most cases unless you are working with a particularly porous wood I’d recommend sealing after staining, or using a very light seal to allow the stain to be more evenly distributed.
However, staining after sealing may prevent problems associated with excess glue and in some cases can result in a more evenly distributed stain.
Checking your Work
A visual inspection may tell if most of the glue has been removed (check the body from a variety of different angles using an overhead light) but often it is difficult to see. The best option if not using a veneer is to dampen the body and see if moisture is pooling up around the area you have just sanded. Glue prevents stain from, absorbing into the timber and will also be the case with moisture applied using a rag.
Once you are confident you have removed the glue, check your work by wiping a damp rag over the timber. If there is still excess glue on the body the moisture will not be absorbed and will begin to pool around the edges of the glue. This will also be the case with any stains applied so it is better to test using water before applying something more permanent to the guitar.
Summary
If you discover excess glue on the body of your new DIY guitar kit, remember there are plenty of options you can try to remove the glue. Working with timber often presents challenges and those who are experienced with timber develop methods to deal with these common issues.
I hope the information above helps you end up with a guitar that you love rather than just running out OK.
 Marty Banner
7 min read
Marty Banner
7 min read