Neck assembly for kit guitars is fairly straightforward for the most part, but there are a few things you will want to avoid doing. This article covers basic information about guitar necks including neck profile and common timbers along with some tips for assembling your guitar neck.
Bolt-On Neck
Most guitar kits will come as either a bolt-on or set neck. Bolt-on necks are typically used by Fender for the bulk of their guitars while set necks are generally used by Gibson (and just about everyone else for that matter).
There are plenty who credit Gibson guitars with having superior sustain and warmth and just as many people will tell you Fender Guitars are much brighter and more consistent when it comes to guitar tone.
Set Neck
Set necks typically are mortise-and-tenon joint fits and can actually be stronger than a bolt in once finished. Most Guitar Kit manufacturers will offer one or the other but mostly bolt-on necks for Fender style kits and set necks for Gibson style kits.
To be honest this post isn't going to argue the merits of either type of neck fit as both have their advantages if done correctly. Bolt-on necks are pretty straightforward and has the obvious advantage of being replaceable should you damage the neck in any way.
The truth is this isn't all that common but it is something to keep in mind.
Set necks, on the other hand, are more permanent (depending on your choice of glue this can be gotten around) and demand a little more consideration when it comes to fitting and alignment, particularly if your neck pocket isn't a super tight fit.
Guitar Necks and Fretboard Timbers
The timber your guitar neck is constructed from will play a small role in your overall sound, compared to the guitar body. However, it's fair to say that some neck timbers will allow the timber used in the guitar body to contribute even more to the guitar's tone.
It certainly impacts the playability of the guitar which has an indirect influence on the tone. I have listed some of the more popular timber strains used in kit guitars below.
Maple
A very hard reliable timber used for both neck construction and fretboards. One of the most commonly used timbers in guitar neck construction, and credited with a very bright overall tone.
Rosewood
Typically used for the fretboard of the guitar. It's ideal for this purpose because it handles human contact nicely being a more oily timber. By far the most common fretboard timber used today.
DIY guitar built by Steven Grusing
Ebony
A much more expensive and fragile timber that many believe is more percussive by nature. Due to its quite fragile nature, it's almost always handcrafted and is not well suited to mass production.
Guitar Neck Profiles
If you are ordering a standard guitar kit the neck profile will generally be a 'U' or 'C' shape. Below are some of the more common neck profiles:
C shaped: As the name implies a common style of guitar neck profile and considered a good 'all-rounder' style of the neck.
Flattened C shape: A shallower version of the C profile and is quite common.
V shaped: They are typically a deeper neck than C shaped neck profiles. Shaped neck profiles are more often associated with vintage instruments and reissues that remain loyal to the original design.
U shaped: U shaped neck profiles are similar in depth to V shape profiles and are commonly seen on Telecasters®.
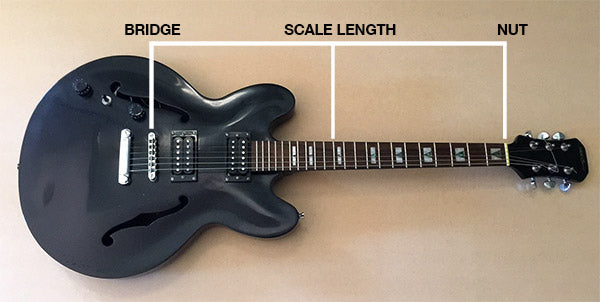
If you are working on a set neck (glued-in neck) put the neck in place and then grab a tape measure or ruler and measure from the inside of the nut to your 12th fret. When the neck is correctly in place the distance from the inside of the guitar nut to your bridge saddles should be double this measurement. Make sure you get this right and then mark the back of the neck with a straight line to ensure you have the positioning perfect when you glue the neck in place.
You should also pop the neck pickup in place to make sure everything is going to fit perfectly before making this more permanent. This should always be the case when assembling a guitar, you want to address any potential issues before you glue or do any finishing work for that matter.
It's easy to overdo this step and pack the glue in there but this is the wrong way to go about things. You want enough glue to ensure a robust fit but not too much that the glue will squeeze into the edges of the neck cavity getting in between your neck and body.
This will have a small impact on your tone and sustain, wood on wood is what you are going for. Ideally, you just want to apply glue to the back of the neck. You should use as little as possible but enough to ensure a strong joint. Typically a good set in the neck will actually be stronger than a bolt-in. There are a number of adhesives you can use, Titebond is generally accepted as one of the best to use.
Clamping, protect the body and don't over tighten
Next, you will need to clamp the neck and leave it to sit for at least 12 hours. Before clamping you should protect your guitar body with a timber block and some soft cloth.
Check the material you use is clean from debris as you will be clamping this firmly onto your guitar and any grit or debris is going to be forced against the body of your guitar and can damage the surface of the guitar body.
When clamping the guitar, don't overtighten as this can squeeze the glue out of the neck cavity and leave glue between the side of your guitar neck and body.
Once in place keep clamped for at least 12 hours to ensure the glue has set correctly (*This may vary depending on the glue you are using. If in doubt read the manufacturers instructions). Most of the time the neck will be set within a few hours but you will be better leaving things at least overnight to really be sure.
 Paul M.
5 min read
Paul M.
5 min read