Today I’m going to show you how to build your own electric guitar, in just a single day. The best part? It doesn’t matter if you:
Have never made an electric guitar before
Have zero woodworking skills
Don’t own a vast array of tools (you can get away with just a set of screwdrivers, clamp, and glue (if your guitar is a set neck) a set of pliers, and it’s handy to have a soldering iron and solder.
In the case study below, I’ll walk you through the entire process, step by step including the ‘quick and dirty guitar setup’ that I guarantee will make your guitar play and sound better than 99% of kit guitars out there today.
You’ve probably heard that DIY kit guitars play badly and sound even worse. Just check out some reviews for kit guitars on Amazon and you will see what I mean. Now in some cases, the complaints are valid, some kit guitars just aren’t made all that well but for the most part, the reason 99% of electric guitar kit builds don’t turn out great is the assembly and final setup.
And that totally makes sense when you think about it, after all, if you were buying an 'off the shelf' electric guitar it will have been professionally set up to some extent e.g. the intonation is correct and the neck will (in most cases) be fairly straight.
So why do the majority of people who build their first kit guitar expect after it’s assembled that it will magically play and sound great without setting the guitar up correctly? It’s crazy when you stop and think about it.
In the case study below I’ll walk you through the assembly of an EXP guitar kit, which turned out great, in fact, I will have no hesitation playing it with my band. If you are contemplating your first build the EXP is a great guitar to start on as the assembly is quick and can be completed in under a day including the final setup. But don't sweat it if you are putting together a different model, the basics are very much the same and this case study will be of benefit to you regardless.
First just a couple of quick points
This article doesn’t cover guitar finishing (or painting/staining if you are unfamiliar with the term). In almost all cases, the finishing would be completed before the assembly. For now, we have plenty of resources on the site to keep you out of trouble.
Secondly, if you have a set neck guitar you are going to need to allow at least 24 hours for the glue to dry before you can get underway.
Ok, with that out of the way let’s break down the entire process step by step.
Assembling the DIY Guitar
Of course, before we set the guitar up were going to need to assemble the guitar correctly. Fortunately, this is all fairly straightforward and follows the steps below:
Unbox, make sure all parts are included.
Attach the neck (glue and clamp if set neck, screw tight if bolt-on neck)
Assemble the tuners, strap holder, string guides
Assemble the bridge
Assemble the electronics
Setup
As mentioned the entire assembly process is straightforward, the only drawback for the inexperienced is the electronics (pickups, volume and tone pots, input jack and pickup selector switch).
So if you have never used a soldering iron before be sure to order a kit that is pre-soldered. Alternatively, be prepared to learn some basics about guitar electronics and soldering.
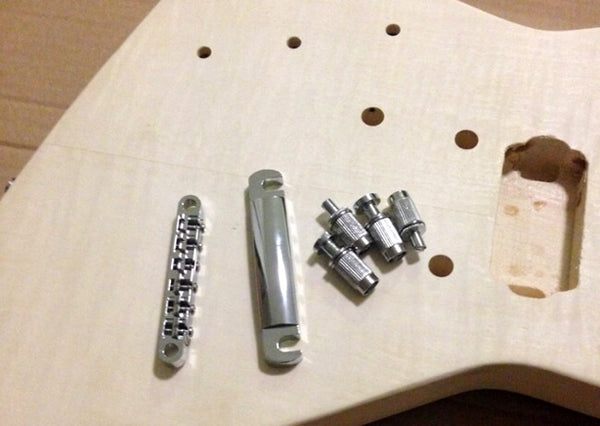
Required Parts and Components
I’ve provided a separate resource for the parts and components you can expect to receive based on the particular model guitar kit you have you have.
If your guitar is not listed below, don’t fret it :) chances are it’s a hybrid of two of the models below.
1 X Volume + 1 X tone control pots (also sold as 1 X volume and 1 X tone)
3 way Pickup Selector switch
Input Jack
6 X tuning pegs (machine heads)
Tune-O-Matic bridge
Nut
You are also going to discover a number of screws, springs, and plastic covers packaged along with the electronics.
In most cases, there will be the exact number of screws required for each component in the heat-sealed multicompartment plastic bags provided.
If you are unsure of the size of the screw required for a specific step you can always double-check by counting how many screws are included in the section you are removing the screws from.
Fitting the Neck
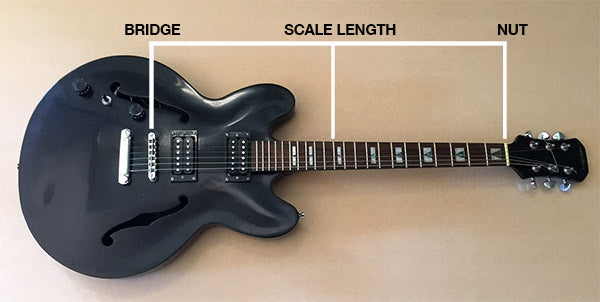
For bolt-on neck guitars, this step really is as simple as it looks. For set-neck guitars, however, you will require some wood glue and a clamp and you will also need to give some consideration to scale length.
For set-neck guitars, it’s essential that you understand scale length, as getting this wrong will affect your guitar’s intonation (pitch accuracy) and in some cases will make the guitar more or less unplayable.
Basically, you need to ensure the length from the inside of your nut (the end that butts up to the fretboard) to the 12th fret is half the overall length from the nut to your bridge saddles.
The diagram below demonstrates how to measure your scale length.
If you have purchased a bolt-on neck guitar, the scale length will have already been measured and the holes for securing the neck will be already in place. For a set neck guitar you will need to check this first, don’t just assume the neck should be pushed in as far as it can go.
Once you have measured the correct placement of the neck, mark the position with a lead pencil on the heel of the neck and the body of the guitar so you can line these up again once you are ready to set the neck in position permanently.
Gluing the Set Neck
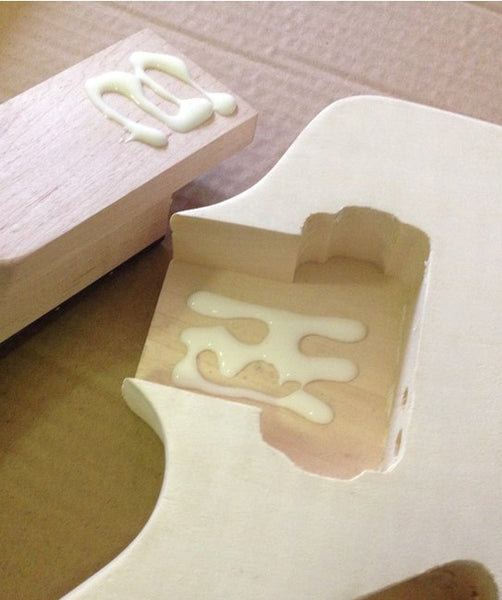
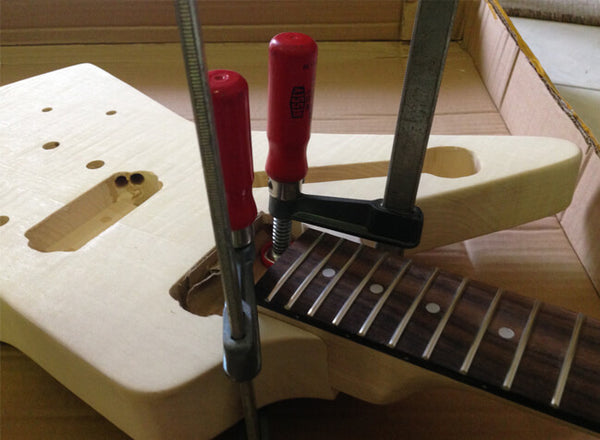
Once you have marked the correct placement of the neck it's time to glue the neck into position. Follow the steps below and be careful not to apply too much glue.
First, dry-fit the neck (It’s always best to slide the neck into place rather than pushing/forcing it in place from the top). The neck should be a tight fit, it doesn't have to be so tight that it's difficult to place in position but if it has any sideways movement it may cause a problem with the alignment of the neck itself.
Apply a moderate amount of glue on the heel of the guitar neck and the base of the neck cavity (e.g. don’t use so much that is squeezes into the sides of the neck cavity).
Once done clamp firmly (not overly tight) into place and leave overnight.
Be sure to use a small section of carpet or timber to protect the body and neck of the guitar, even if your clamp has plastic protectors. There's nothing worse than removing the clamps and finding you have left a dent in the timber of your guitar.
When it comes to glue, I generally use Titebond or Tarzan Grip.
Tuners
Next, we have the tuners, otherwise known as your machine heads or tuning gears. Depending on the type of headstock (3 per side or 6 on top) you will have either 3 left and 3 right facing tuners or 6 of the same.
The tuner assembly involves two simple steps.
Firstly inserting the tuners themselves, then the washer and bushing. Some kit guitars will come with the tuner screw holes predrilled. If this is the case you’re all set. If not, it’s still a relatively straightforward process.
Installing the Tuners:
Insert the tuners into the pre-drilled tuner holes.
Turn over and slide the washers over the tuners and tighten the bushings. This will tighten the tuner sufficiently for you to correct the alignment of the tuners.
Align your tuners with a steel ruler or anything with a straight edge.
Once satisfied with the alignment use a very fine drill bit to drill the pilot holes (1/16 inch is ideal). You will need to pre-drill these holes, as the screws themselves are easily stripped.
Once the pilot holes are drilled, insert the screws and tighten by hand. (*Don’t use your drill, as these very fine screws can be stripped easily.)
Once in place use a set of pliers to tighten the bushings further (being careful not to scratch the chrome tuners) and you’re done.
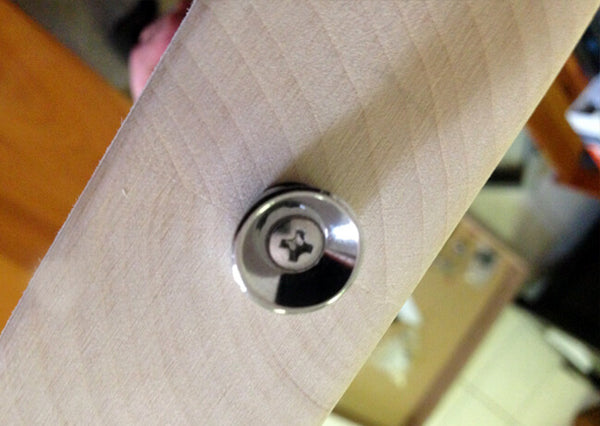
Strap Buttons
No need for lengthy explanations here, simply measure the exact placement for your strap buttons and screw in place at the front and back of the guitar, making sure the felt washers are in place to protect the timber.
Depending on your body timber, you may not need to drill pilot holes first. Generally speaking, softer timbers such as Paulownia or Basswood won't require pilot holes, while denser timbers e.g. Alder typically will.
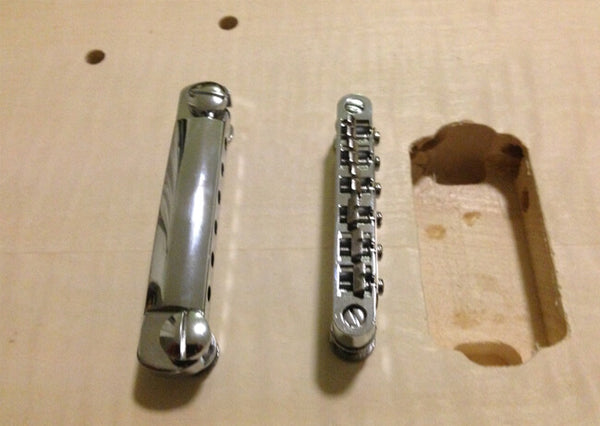
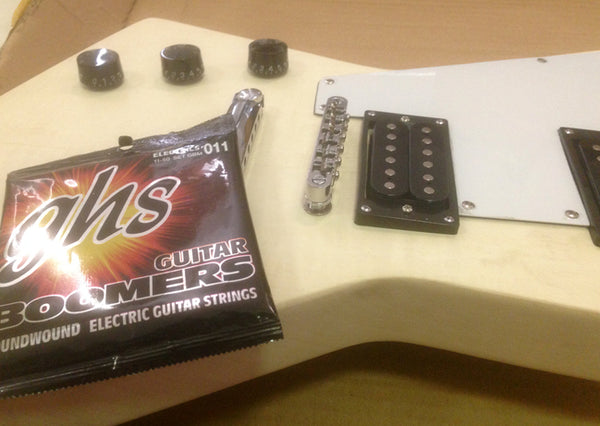
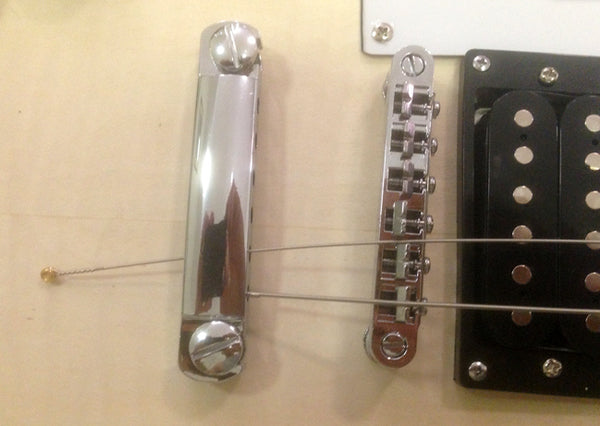
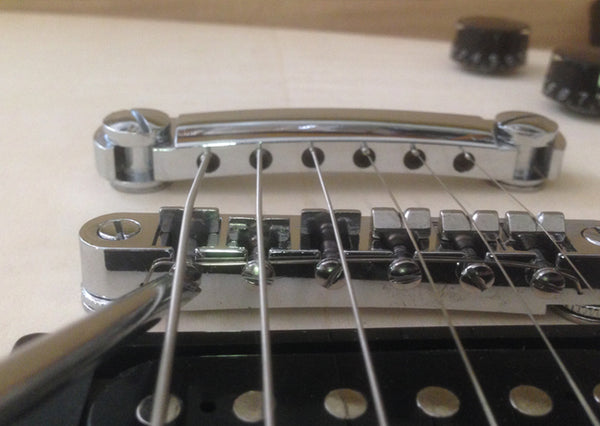
The Bridge
How you go about installing the bridge will depend on your guitar. I’ve covered the differences between common guitar kit bridges here. For the EXP style guitar, however, we’ll are be installing a Tune-o-Matic bridge.
Installing the Bridge
First, we’ll need the bridge and tailpiece posts. These are the adjustable posts shown in the picture above.
To begin, push the two tailpiece posts into the two rear holes provided. Please only apply a small amount of pressure here. (*We will need to remove these again when earthing the electronics, so only push in place gently for now).
Once your tailpiece posts are loosely in, repeat the process with the bridge posts, taking care to avoid them going in on any kind of angle. You can push these right in, as they won't be removed again.
If the bridge post requires some force to insert into place, a hammer will do the trick but make sure the neck is fully supported and the guitar is well padded beneath. Also, don’t use a metal hammer directly on the post (use a timber offcut) to protect it.
It’s important these go in straight. If you notice they are on an angle in any way, stop, attempt to adjust and continue on. They should be driven into full depth, which will leave a small lip on the surface of the guitar.
Next screw back in the thumbwheels. The larger face of the posts is used in the tailpiece.
That’s pretty much it for the bridge, you can position the bars to get an impression of the bridge itself but these will then be taken off as they won't remain in place without tension from the strings.
Lastly, don’t be alarmed if you notice your bridge is on an angle. This is actually done deliberately for intonation purposes. The angle compensates for the heavier gauge strings by increasing the length of the string marginally.
If you aren’t familiar with intonation, don’t sweat it we will cover this in more detail when setting up the guitar.
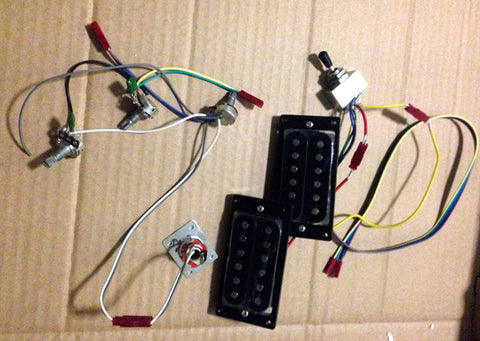
Electronics
Next, we’ll get the electronics in place. This includes your pickups, volume and tone pots, output jack and pickup selector switch.
The EXP has a fairly standard setup, and is similar to other models such as the LP, SG and a number of hollow-body guitar kits:
2 X humbuckers
3-way selector switch (bridge pickup, neck pickup and combined)
1 X volume
2 X tone
Input jack
If you have a pre-soldered kit then this step is really quite simple. If you do need to attach your wires to the pots, selector switch and input jack there are a ton of free wiring diagrams online and wiring and soldering tutorials online.
Getting Started
In most cases kit guitars generally won’t require any soldering, They are often pre-soldered to the tuning and volume pots and pickup selector switch. The pickup wires and input jack wires are then joined once positioned via plastic clips (These are red in the image above) attached to the end of the color-coded wires.
The wires are color-coded and pre-soldered to make the process of installing your electronics quite simple. However, solder joints tend to break if the wires are manipulated even a little, so it’s a good idea if you don’t already own one to beg, borrow or steal yourself a soldering iron and some solder in the event a wire comes off.
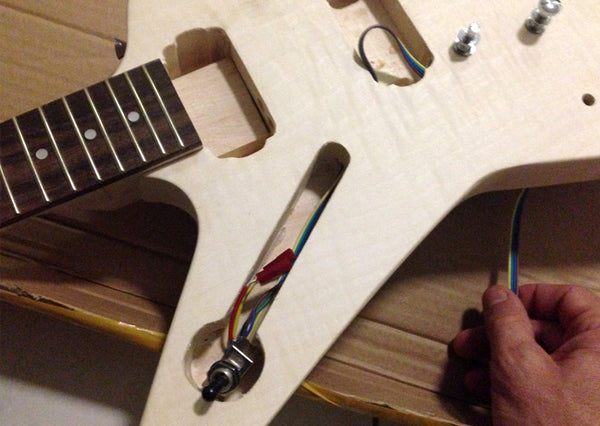
The order of how you go about things is important. There’s no point installing your pickups first as your wires from the pickup selector may need to travel through the same cavity. Generally speaking, it's advisable to start with your input jack and selector switch, followed by the pickups.
First, insert the input jack. This get’s threaded through the input jack hole and positioned before screwing in place. You may need to drill pilot holes first depending on the timber your body comprises of.
Next, we’ll move onto the pickup selector switch, which consists of two shorter wires for the pickups and 4 longer wires for the volume and tone pots (potentiometers).
To install the pickup selector switch on the EXP just sit the switch in position as per the photo and thread the longer wires through the pre-drilled hole at the back of the cavity through to the control box cavity on the rear of the guitar.
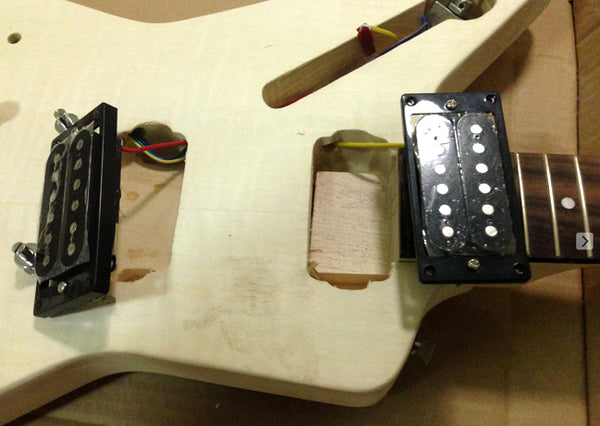
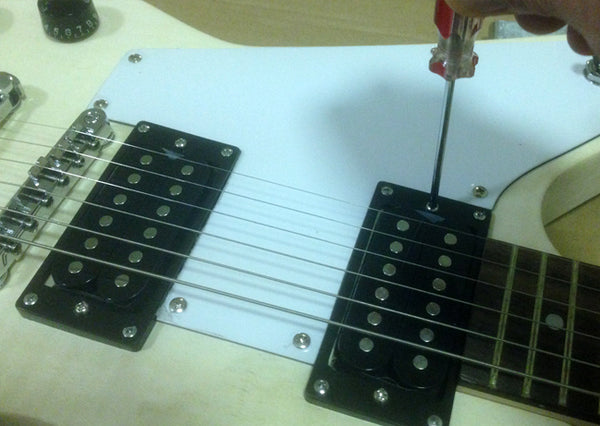
Installing the pickups
Your pickups will vary based on your guitar. If you have ordered an ST or TE style guitar, these will be generally be pre-mounted on your scratchplate, so the work’s already done for the most part.
If assembling a guitar with nickel covered pickups you will want to ensure the pole pieces are on opposite ends. e.g. the front pickup poles should be closest to the neck join, while the back pickup poles should be closest to the bridge.
Generally, the pickup rings will be on an angle that makes it fairly easy to work out which way they should face based on the contours of the guitar body, as per the image below.
When you first look at the two pickups you will see some subtle differences e.g. the pickup rings are thinner on one set of pickups and they may also be angled at the bottom. The angle is generally to compensate for the natural contours of the guitar and the neck pitch, so fitting these the right way around is pretty straightforward. The highest pickup goes to the bridge with the highest edge closest to the bridge with the neck pickup facing it’s the lowest edge against the neck.
Once you have established the orientation of your pickups place them in the cavities provided and thread the wires through the pre-drilled holes found at the front (neck pickup) and side (bridge pickup).
Once threaded connect the corresponding colored wires to the clips provided from the pickup selector switch. be certain these are correct before doing so, however, as it is almost impossible to separate these once joined.
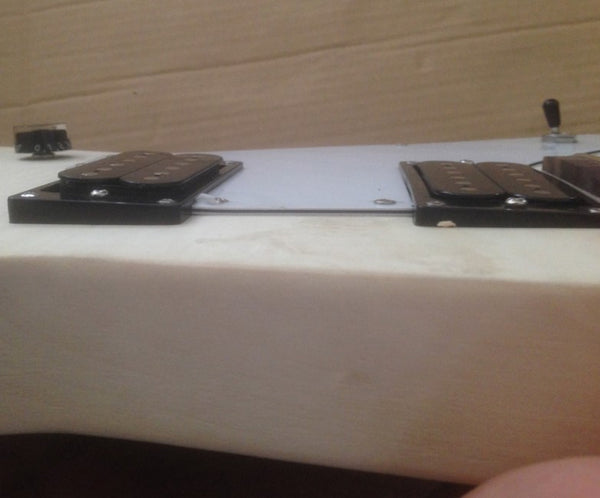
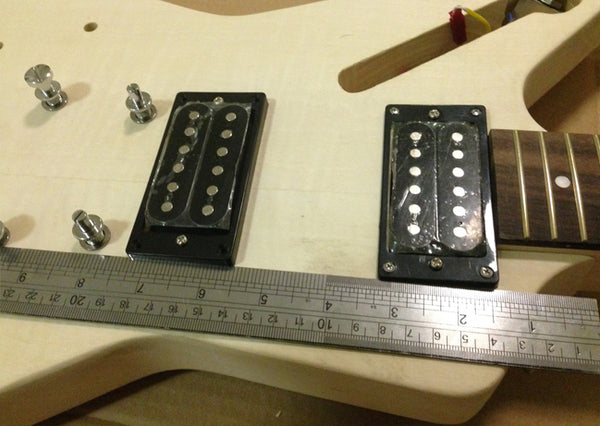
Before we screw the pickups into place. There are a couple of things to keep in mind. First, you want the pickups to be aligned, symmetry is important when it comes to assembling a nice looking guitar and lastly, we will want the scratchplate to fit well.
Pickup Alignment
Loosely fit the scratchplate and take a look at the positioning of the pickups. While the cavities are routed to a specific size there is room for the pickups to move around a little so you want to make sure of the position before screwing the pickups into place that the scratchplate will fit.
Once you are satisfied, make a couple of small pencil marks to give yourself an approximate idea of placement.
Next, with the assistance of a steel ruler align the pickups as per the image above. The neck pickup should fit tightly against the edge of the neck on the EXP so you can fit the bridge pickup based on it’s alignment to the neck pickup.
Once satisfied screw the self-tapping screws into place, by screwing the opposite diagonal sides first. e.g. screw the top left in place, check the alignment again and then screw the bottom right screw into place. Once done insert the remaining screws and tighten.
Installing the Scratch Plate
Next, we’re going to install the scratchplate (pickguard), as this will allow us to flip the guitar over without the pickup selector falling out and running the risk of our solder joints breaking.
First, unscrew the toggle switch nut and washer from the pickup selector.
Position the pickup selector through the provided hole on the scratchplate
Place the washer and tighten the nut until it’s sitting flush against the scratchplate.
Fit the scratchplate loosely and make sure everything fits as it should. If your pickups have moved and the scratchplate isn’t fitting you may need to use a file to remove a few mm from the edge. Do this in small increments so you ensure you don’t remove too much at once.
Once the scratchplate fits, start inserting the self-tapping screws. If the timber of your guitar body demands it, drill pilot holes first using a 1/16 inch drill bit.
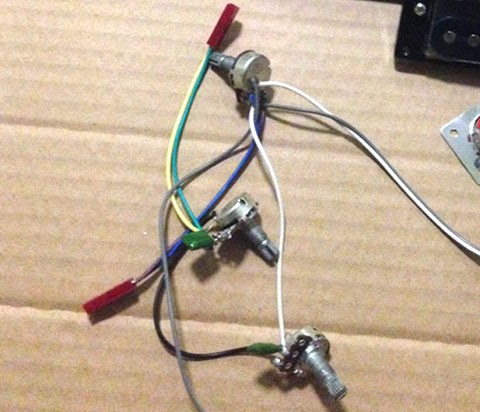
The Control Box
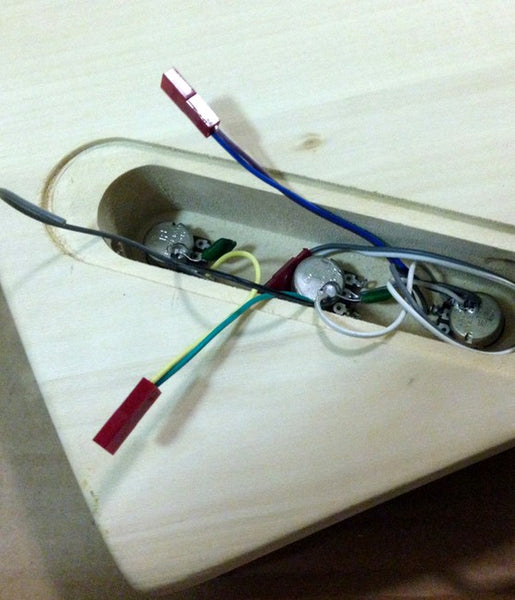
We’re getting close to finishing the electronics, in fact, we're close to completing the assembly of the guitar. To add the control box, first flip the guitar over, you will notice on the EXP there are three holes drilled for the volume and tone pots along with a wire clip extending from the input jack.
Don’t be daunted, in the majority of cases, these are color-coded and easy to match up and clip together. Let’s get those pots in place first.
As you can see from the image above there are two pots with wires extending to a ceramic green top. These are the capacitors. I won't go into too much detail about these in this article, suffice to say the role of the capacitor is to remove high frequencies before they get to the input jack and ultimately your amp. As a result, the capacitors are found on the tone pots, leaving the pot without a capacitor as the volume.
I generally utilize the first pre-drilled hole for the volume but you can put these in any order you see fit.
You will also see a loose gray (sometimes blue) wire with one end not connected to anything. This is used to earth out the signal, we’ll cover this in more detail in a minute.
Installing the Pots
Begin by threading the first pot into the first pre-drilled hole. Be careful to ensure there are no wires beneath the pot as this will stop it sitting flush against the timber and make it difficult to fit the washer and screw. Once in place, insert the next two pots making sure they also sit flush against the timber.
Once your pots are in position, sit the guitar on its side and maintain some pressure on the pots so they don’t fall out.
Next, grab the three washers and nuts provided and first add the washer then add the nut and tighten the pot against the guitar body.
Do this for all three pots and then flip the guitar back over with the control box cavity facing upwards.
Lastly, connect the wires to their respective colors.
Earthing The Guitar
Earthing the guitar is pretty simple, we just need to thread the loose gray wire (this will occasionally be blue) through the small hole drilled into the bottom inward-facing side of the control box cavity.
The basic idea is to position the earth wire to sit against the tailpiece bushing, which will ground/earth out the signal to reduce excess noise. To do this involves removing the tailpiece post that we only loosely pushed into place when installing the bridge.
Installing the Earth Wire
First, flip the guitar and remove the corresponding tailpiece bushing. Then simply push the wire through the hole until it appears through the tailpiece pole sleeve. A word of warning, this can be tricky, patience is key, there's no real trick to it.
Next, strip some of the plastic casing away to reveal the naked wires.
To finish we then add the tailpiece bushing keeping the naked wires from the earth wire against the side of the bridge pole hole, ensuring it will be in contact with the metallic tailpiece bushing, allowing the signal to earth out. As mentioned in the bridge assembly section, make sure these go in straight.
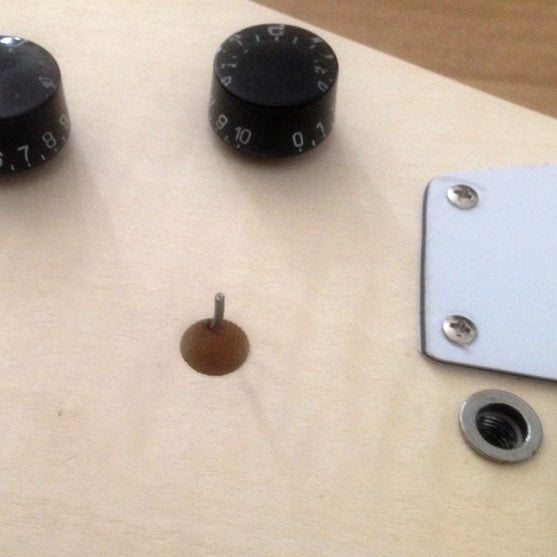
Once done screw the plastic cover on the back of the control box and the electronics are complete.
And that’s basically it, you have assembled an electric guitar. But that’s not the end of things, we still have our final setup to complete and strings to put on. Let’s dive straight into the ‘Quick and Dirty Guitar Setup’ shall we?
I recommend that you don’t skip this part, it’s probably the most important part of the article! This is the difference between a kit that looks ok but you don’t enjoy playing that much, to a guitar, you take with you and proudly say ‘I made it myself’ when someone asks you what kind of guitar is that?
The Quick and Dirty Guitar Setup
First things first, this method can be used for all electric guitars, not just kit guitars you have just assembled. So be sure to apply this technique to all your electric guitars. I guarantee they will play and sound better than they do now if they haven’t had a setup for a while.
There are no groundbreaking methods included here, it’s just an effective step by step method to finish your guitar that really nails it for anyone who hasn’t done a setup before.
The setup covers 5 major steps in the following order:
I get it, but here’s the thing...it’s really not that difficult to set your guitar up properly, it’s just a matter of learning the steps required.
Sure, it makes sense if you are a professional musician to take the guitar in for a pro setup, the guys that do this day in, day out have a lot more experience not to mention specialised tools but if you want to save your hard earned cash and learn something new at the same time then learning how to set up your guitar is invaluable.
Changing the Strings
First, you are going to want to change your strings. Most kit guitar suppliers provide strings with their kits but the strings themselves are, for lack of the better word "basic" and really only serve the purpose of providing you something to use until you get a set of your regular, tried and true strings.
Anytime you perform a set up it’s new string time, so shell out the $15 and grab a set.
Not sure what strings to try?
I recommend Ernie Ball Slinky’s or GHS Boomers, go for a light gauge to start with e.g. .10’s to .46 until you have played enough to develop a preference.
Stringing your Guitar
Screw the thumbwheel on the bridge all the way down.
Add the 6 strings, pushing the strings through the Tune-o-Matic bridge tailpiece holes.
Snip the strings using a pair of wire cutters.
Lastly, give the strings a good stretch. Tune them to concert pitch and give them another good stretch. Repeat the process 3-4 times to ensure your strings remain in tune when played.
Straightening The Neck
Next, we’re going to make sure the neck is straight...well in a sense at least. You see, a dead straight neck isn’t ideal when it comes to electric guitars. What we need is a slight (very slight) neck relief (inward bowing neck).
We do this to reduce the chance of fret buzz. Basically by creating some relief between the first and last fret the string can vibrate freely without buzzing against any of your frets.
The amount of relief is really up to you, but too much can have an effect on your action, particularly from around the 5th to 14th fret, while too little and you will have issues with fret buzz.
Setting a Slight Neck Relief
To do this we’re going to need to adjust the truss rod. (We haven’t added the truss rod cover yet so the truss rod is easily accessible). Your kit guitar will have come with an alum or hex key specifically designed for the truss road so firstly locate the alum key and make sure it fits. The truss rod is a straight steel bar going through the neck itself, that when tightened (bows the neck outward) or when loosened bends inwards.
Before we make any adjustments though, we’re going to need to check how straight the neck is.
Adjusting the Truss Rod
The truss rod is found on the headstock of your guitar, for most guitars anyway. There are guitars that have the truss rod at the opposite end of the neck but the EXP’s truss road is located as per the picture below.
The EXP had an almost dead straight neck so I set about adjusting ever so slightly until the neck had a slight relief. This only took 3/4 of a clockwise turn.
When adjusting your truss rod, remember to only turn in small increments at a time and continue to check at regular intervals.
Setting your Guitar Kit's Action
Your guitar’s action is the distance between your guitar strings and the fretboard.
For many guitarists, a lower action makes the guitar easier to play. The notes require less downward pressure to be fretted which in turn allows for greater speed around the neck. However, if the action is too low you will also run into problems with fret buzz.
Your ideal action is basically whatever is best suited to your playing. A lower action as mentioned above has advantages when it comes to playing faster, however, the trade-off can be your guitar’s sustain which is thought to improve with a higher action. If you’re a slide player you will definitely prefer a higher action, so take into account your style of playing first.
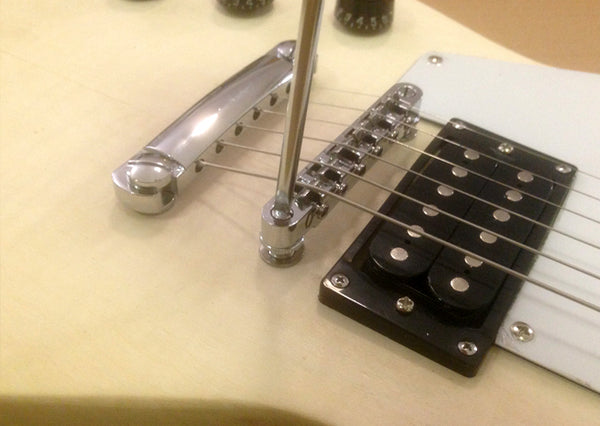
How to Set Your Guitar’s Action
For the EXP this is pretty straightforward. Using a flat-tip screwdriver, turn the bridge posts clockwise to lower the action or counter clockwise to raise the action.
For the tailpiece posts, there’s really no point in having these anywhere except fully screwed down. You may notice your sustain improves as well.
Only increase the height if the angle from the bridge to the tailpiece is quite sharp as you may start breaking strings.
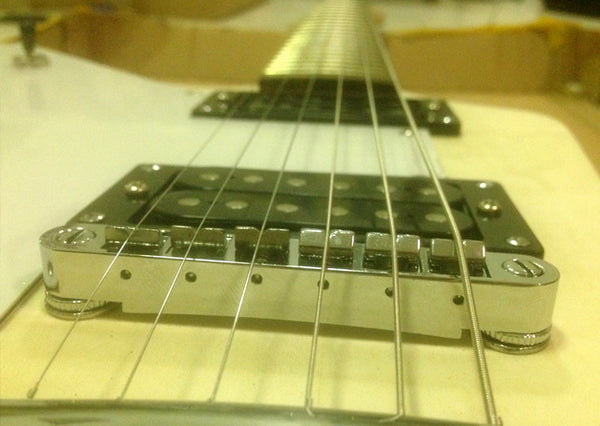
Fretboard Radius
Fretboard radius refers to the curvature of the fretboard. This should not be confused with the neck profile. Neck profile refers to the radius of the neck and not the fretboard.
As you can see in the picture above, the fretboard of your guitar has a gentle curve. The saddles on your bridge match this curve.
As the EXP uses a Tune-o-Matic bridge, this isn’t a problem as the saddles are not adjusted individually. However, on other models such as the ST or TE the saddles are adjusted individually and the fretboard radius should be kept in mind.
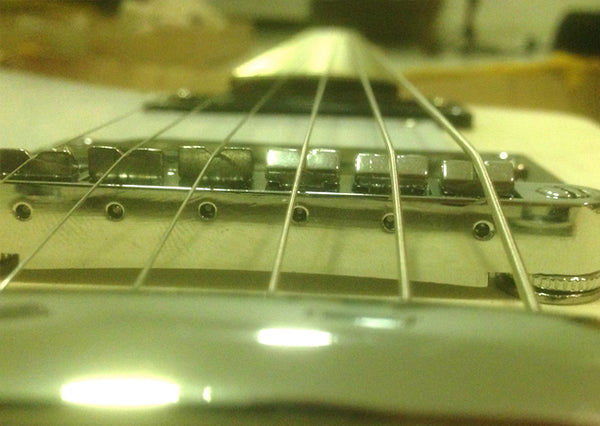
Intonation
Now we need to check the guitar is in tune with itself. Intonation is the pitch accuracy of the guitar, if the intonation is off, your playing sounds off so it’s an important part of the setup process.
To check your guitar’s intonation first tune the guitar and then check the tuning of each individual string at the twelfth fret harmonic. Being a full octave it should be the exact same pitch as the open string. If however, it is sharp or flat your intonation is off and needs to be adjusted.
To adjust the intonation if the 12th fret harmonic is sharp we need to lengthen the string, if on the other hand, it is flat we would need to shorten the string. The string length is adjusted at the saddle for each individual string.
How to adjust Your Intonation
Using a flat tip screwdriver turn the saddle screw clockwise to shorten the string and counterclockwise to increase the length of the string.
Only turn the adjustment screw a half turn before checking the intonation again
If you have turned the adjustment screw as far as it will go, you may need to check your neck relief as this will also shorten the length of your strings.
Repeat for all 6 strings
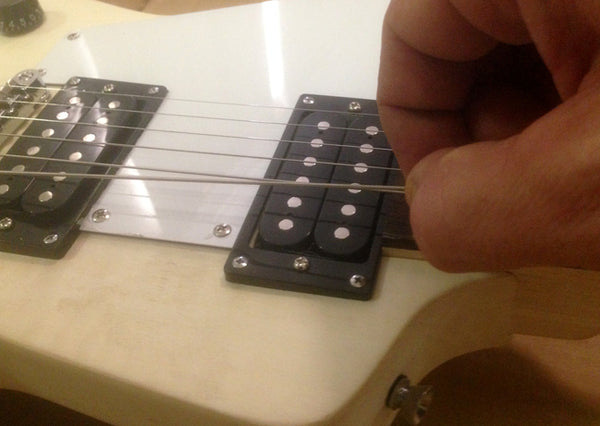
Pickup Height
Finally, we come to pickup height. This is another important component of your guitar's overall tone and needs to be considered carefully. Before we go too far down the path, it’s probably a good time to mention that the majority of kit guitars come with entry-level generic pickups. That’s not to say they sound half bad, but it’s often the first place someone will upgrade their electric guitar.
Even so, getting the ideal pickup height of your electric guitar can make a big difference to your guitar’s overall tone. I’ve already covered why this is important in another article so for the sake of keeping things moving along, we’ll get into the meat of things early.
Plug in your guitar at medium/high volume (There’s no point testing at a lower volume than you play at) and use the same tone settings on the guitar as you do normally.
The EXP has two humbuckers so the pickups should sit relatively flat, but if adjusting single coil pickup it’s best to make the bass side of the pickup a little lower than the treble side.
Adjust the height of the pickups by turning the adjustment screws. Generally speaking, humbuckers can go as high as you like without getting too noisy but single coils should be adjusted based on the amount of noise you are hearing.
You will typically find a bit of a sweet spot, but it’s pretty easy to lose objectivity when you are testing these things so if you start struggling to hear a difference it might be time to give it away and come back later with a fresh set of ears.
Summing things up
And that’s it.You are done. Guitar assembled, final setup complete. Of course, as mentioned early on, this guitar would normally have been painted first, but that’s the subject of our next case study.
If you're interested in learning more about guitar finishing check out articles below:
 Marty Banner
24 min read
Marty Banner
24 min read