How to Apply a Sunburst Guitar Finish
Before going into too much detail in this article, keep in mind that this is just one method of applying a sunburst guitar finish. This method is relatively easy to do for someone new to guitar finishing which is why I recommend this approach. If you are more experienced there are a number of great resources available online such as stewmac.com and you will also find any number of tutorials available on YouTube. With that out of the way let's rip in!
What is a Sunburst Finish?
Originally conceived to imitate an aged French polish finish (as seen on vintage violins) the sunburst finish is quite achievable if you follow the steps outlined below. I refer to sunburst in this article but in reality, there are a number of 'burst' finishes which loosely go by the term 'sunburst' such as: In most cases, we refer to a sunburst finish as a finish that features graduating color from the edge of the guitar to the center and that is how we will reference a sunburst finish for the duration of this article but technically there are a number of 'burst' variations you can try.Shopping List
Below is a list of essential products required to follow along with this article. Most of the items are readily available and quite affordable.- Sandpaper
- Sanding Block
- Painters Masking Tape
- Masking tape (for protecting binding)
- Woodgrain Filler
- Scraper
- Black Stain
- Guitar Toner Lacquer (3-4 packs, Amber and Tobacco)
- Clear Lacquer (3-4 packs)
Masking

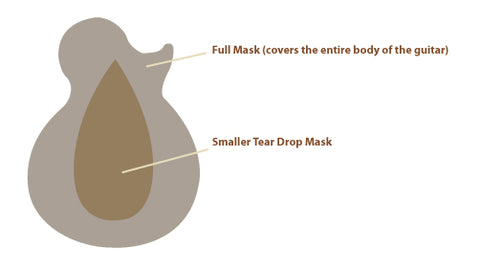
We will also be using 2 floating masks, so it’s a good idea about how to cut out the mask for the job. The masks will sit above the guitar's surface and will allow you a lot more control over the application. Use cardboard as your mask material and go for something you can cut easily enough with a knife but also something thick that won’t bleed. The first mask will cover the entire face of the guitar. The second mask will be in the shape of a teardrop and be much smaller (Refer to example image above). We are also going to need some lint-free material such as an old cotton t-shirt to apply the base stain.
First things first – Make Sure it's a Good Fit
If this is a new guitar kit, then put the guitar together first. Naturally, you will be pulling it back down to apply the sunburst finish but you need to know that you won’t be running into problems down the track. Specifically, you don’t want to have to risk the finish you have just invested a lot of time into by making adjustments to the guitar afterward.Prepping the Guitar Kits Timber
Once you have assembled, checked everything and addressed any potential issues you can start to prepare the timber.- First sand back until you have a completely smooth surface to work with. Use a sanding block and work with the grain. We won't cover sanding in detail here, so if you do need to brush up a little try this article for more information. Once you are done be sure to remove any excess dust and then clean the guitar with acetone if available. The goal here is to have a surface that will absorb the darker stain we are going to use to bring out your guitar’s wood grain pattern.
- Next, apply your wood grain filler if required, again we won't cover this in any great detail but this article will explain the process in more depth. Just be sure to apply thickly over the face of the guitar and then work in with a scraper or my preference is a damp rag to really work into the grain. Work first with the grain and then against it. Once dried scrape back with your scraper and then wipe off with a semi-damp rag. Some timbers such as basswood are quite tightly grained so may be able to skip this step.
Highlighting the Grain
First, we are going to bring out the natural wood grain which works a treat on flamed maple which is what the typical Les Paul clone will have on its top surface. Essentially we are going to apply a dark base coat stain, work it into the timber and then sand back the surface leaving the wood grain highlighted.
- Apply the darker stain using your lint-free cloth, rub it in thoroughly and get an even coat across the face of the guitar.
- Wait up to 30 minutes after applying your base coat before gently sanding to remove.
- A word of warning. Be careful not to sand through your veneer maple top. In most cases, the veneer is very thin (1mm or less) towards the edges of the guitar.
Next, we will be applying 2-3 coats of sealer. There are a couple of reasons why we should do this:
- We will be sealing our dark base coat stain
- If by chance we need to do any repair work after our next coat we will only be sanding back what we have done in the previous step due to the base coat being sealed.
Fade to Black
Next, we are going to spray the back and sides using the dark lacquer or black. The important thing here is to mask the guitar body and fretboard. If your guitar has edge binding e.g. A Les Paul you can use painters masking tape to cover the binding nice and tight. This is commonly used in the automotive industry for pinstriping and is ideal for this type of application.
When masking the face of the guitar we want our cardboard mask sitting above the face of the guitar by about ½ inch so our edge coat will feather in a little. You could use matchsticks here or fold some wedges from the cardboard yourself.
With any spraying, it’s a great idea to keep your spray packs in warm water before using. Cold spray packs tend to clog up and run more easily. If you can hang your guitar before applying the edge and back coats then do so, this will make things much easier to spray the back and sides.
Behlen Lacquer is a transparent finish but if applied thickly on the edges and back you will get an opaque finish. You can of course also use a black if that is your preference.
When you are ready to spray remember to keep even arm movements and spray quite quickly. This is going to take a number of coats so don’t try to apply it too thick, the secret is to build up your color layer upon layer. When you are spraying near the face of the guitar hold your can a distance away so that you get a nice feathered edge. Basically the closer you get the harder the edge line you will make. We really want a nice blend of color so keep some distance from your guitar.
Once completed let the guitar dry and then start to lightly sand out any areas you are not happy with on the face of the guitar. Remember since we applied a sealer over the base coat you can sand the black lightly without being overly concerned.
Apply the Amber
Next, we will be applying the amber lacquer. You will need to mask the sides of the guitar with your painters masking tape before applying. Once done place the guitar on a solid workbench face up. Start spraying your amber lacquer lightly using even arm movements to give an even coverage and feather in from the edges. Remember don’t try to cover your guitar in one go you will just create a headache for yourself if you go too heavy right from the start. Your stain will run and you will have repairs to do which will only overcomplicate the process more than it needs to be. Things should already be starting to take shape by this stage and you should see a nice transition from your amber to the darker edge.Add Tobacco..to get a Smokin Transition of Colour
Now it’s time to really finish things off with a nice transitional tobacco that will give you that beautiful 3 tone burst effect. You can apply this freehand if you know what you are doing or you can apply your tear drop mask to the center of the guitar and spray lightly outwards to the edge of the guitar. Keep applying by moving from the middle of the guitar to the outer edge until you are happy with the gradation of color. Once dried you can then start to clean up a little. Take a close look at your handy work and sand back any spots or areas you are not completely satisfied with.Finish on a Clear Note

The Final Polish
The trick here is to use a lighter gauge sandpaper each time. We are essentially removing the marks from the gauge of sandpaper previously used and then moving on to a lighter gauge with an eye to finally moving to a buffer or polishing cloth to really bring that glossy look out. Keep lightly sanding and then moving to a lighter gauge until you run out of sandpaper, next move onto wet and dry sandpaper. For wet and dry sanding I like to submerge my sandpaper for an hour before using but this isn't essential.
You can then use light steel wool or move on to your buffer. From here you can just keep buffing or hand polishing until you are completely happy with the finished look.
Job Done!
You should now have a beautiful sunburst finish on your hands. Just to recap here's the steps we have taken below:- Prepared your guitar for staining
- Applied a dark base stain to highlight your wood grain pattern
- Sprayed your edges back and sides
- Applied an amber lacquer
- Applied a tobacco or blending lacquer
- Applied 5-10 clear finishing coats
- Light sanded and polished your guitar to a beautiful finish.
Also Read: Some Important Guitar Finishing Safety Tips That You Must Follow
