How to Wire a Stratocaster® Guitar Kit
In the following article, we're going to be running through the basics of wiring up a Stratocaster® Guitar Kit. These articles are aimed at keeping things simple so if this is your first guitar kit the following information should be useful without getting overly technical.
Guitar Kit World ST style DIY Guitar Kits
Build your own Stratocaster® style guitar using our DIY ST guitar kits. Featured ST style DIY Guitar Kits:
- Custom Shop Solid body ST guitar kit
- Stock DIY ST style kits
Preparation
Before we get going just keep a couple of things in mind. Much like guitar finishing, guitar wiring is a job that takes a steady hand and concentration. Chances are if you have never operated a soldering iron before you probably won't do a great job first-up without putting in some practice. This is much the same as guitar finishing where it's recommended practicing on a spare piece of timber before applying your finish.
With this in mind consider using your soldering iron to make some joins on some spare pieces of electrical wire and get a feel for the melting point of the solder and how best to work with it. Try and keep your joints neat and only use as much solder as you need. The more confident you become the less solder you will actually use. The goal is to make clean, neat connections that don't require excess solder.
Below are a few useful tips when it comes to soldering that I recommend you practice before starting on your guitar kit.
- Always keep a thin coat of solder on the tip of your soldering iron (Tinning)
- Tin the components you will be working on as well e.g. pickup selector and pot lugs.
- Don’t let the soldering iron get too hot before tinning your soldering iron and components. The solder forms into balls that quickly become difficult to work with if it gets too hot. If you are using a soldering station you will have some control over this.
- Always clean away excess solder from both the soldering iron and the components. Tinning only requires a thin coat, much the same as paint sticks to a stirring stick.
- Heat up the area to be soldered before applying the solder.
Parts Required for Wiring up a Strat®
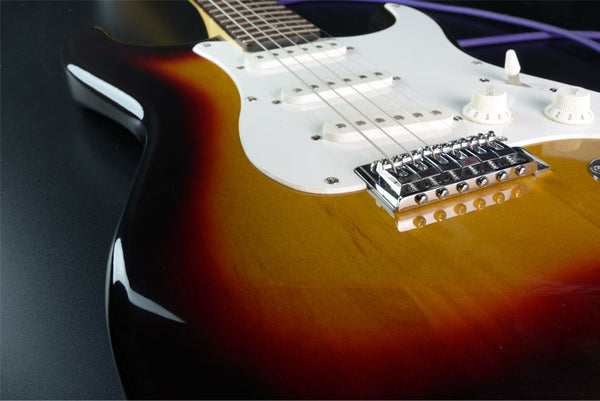
The standard Stratocaster® is arguably the most recognizable of all guitar shapes and is typically a 3 single-coil pickup configuration mounted on the scratchplate. Below is a list of the components you should have included in your guitar kit.
Required Components
- Scratchplate
- 3 single-coil pickups
- Output jack
- 3 X Potentiometers (Volume and tone pots)
- 5-way pickup selector switch
- Capacitor
- 2 X electrical wires (1 hot, 1 ground)
Required Tools
- Soldering Iron
- 60% tin, 40% lead rosin core solder
- Wire cutting and stripping tool
- Phillips head screwdriver
Getting Things Underway
First thing's first, clear a decent-sized workspace and be sure to lay down some form of protection for your guitar's new finish. It's best if the guitar can be secured to stop any movement while working on it. The best way to do this is to lock down the head of the guitar, ideally using a vice. Keep the components needed for the job separate and easy to access. This is important when you have a hot soldering iron on the go, you want to work quickly without having to hunt around for the parts you need.'Attach the Pots and Pickup Selector to the Scratchplate
Ok so time to jump right in, the first thing you will want to do is attach the pots and pickup selector switch to the scratchplate. This is simply a matter of pushing the pots into position and tightening up the nut on the top side of the scratchplate. There will also be a nut that locks the pots into position on the underside or of the scratchplate. Most of the time you won't need to adjust this but if you need to adjust the height of your pots this is where you would take care of it. An example of where this might be useful is if you went a little too hard with your finish and you have more paint on the guitar than normal. In this case, you may need to adjust the nut to allow a little more height for your pots.Positioning the Pots
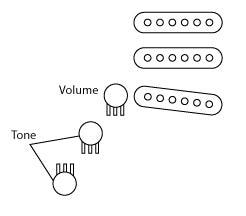
Tone and Volume Pot Positioning
On a Stratocaster®, the volume pot is the one closest to the pickups. The volume pot should be attached with the lugs facing away from the pickups towards the tone pots. The tone pots should be positioned with lugs facing inward toward each other.
Full-size wiring diagram available to print at the bottom of this article.
The Output Jack
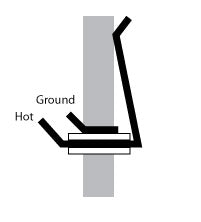
Our first piece of the action with the soldering iron will be soldering the input jack. We are aiming to connect the 2 electrical wires (hot and ground) to the two lugs on the output jack. The hot wire (red) needs to be attached to the outside lug while the ground joins to the inside lug.
Now would be a good time to get your soldering iron heating up.
Remember to tin your soldering iron and use just a small amount of solder to connect to make your joints. Once you are satisfied with your work you can attach the input jack to the guitar with your screwdriver by screwing the two self-tapping screws into the timber of your guitar. It goes without saying to make sure you align the input jack carefully beforehand.
Soldering the Tone and Volume Pots
Ground Wires
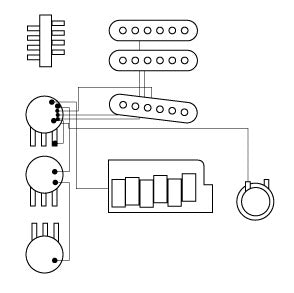
- When using electrical wiring first strip a small section from each end using your wire cutting and stripping tool. Don't go overboard just remove enough of the plastic casing to give you room to work with.
- Next, apply a small amount of solder to all three pot cases, this can be just a small drop of solder near the outside edge of the pot casing. The reason we are doing this is to attach the ground wires (black).
- Start off with the volume pot, join the lug on the right-hand side to the pot case using a small piece of electrical wire. Be careful to use just a small amount to avoid things getting messier than they need to be. You can also simply bend the lug onto the case and then add solder but I prefer to keep things neat and tidy by using a small piece of wire.
- Next, grab the three black ground wires on your three pickups and join the ends together and solder to the volume pot case as well.
- The next step is to solder the bridge ground wire to the volume pot and the input jack ground wire to the volume pot.
- Next, we need to connect the two-tone pots to the volume pot. To do this simply cut two sufficient lengths of wire and connect firstly the two tone pots and then connect the middle tone pot to the volume pot again on the back of the casing.
Grounding the Bridge
In most cases, your bridge will already be grounded as it will be connected to the tremolo. If not insert the ground wire beneath the bridge and through one of the screw holes so it is grounded.Soldering the Pickups (Hot Wires)
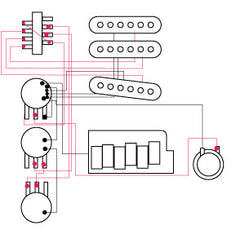
The hot wires from your pickups need to be first connected to your pickup selector.
- To do this we start with the neck pickup, joining the wire to the lug on the outside of the pickup selector closest to the volume pot. Your pickup selector will have 4 lugs on each side, work backward by connecting the neck pickup followed by the middle pickup to the second lug and lastly the bridge pickup to the third lug. You are probably wondering why there's a spare lug not being utilized. The reason for this is we use the last lug to connect to the first lug on the inside of the pickup selector. Cut another small piece of electrical wire and make the connection with your soldering iron.
- From the last lug, you just soldered cut another piece of wire long enough to reach from the lug to the volume pot. For this connection, you will be making the join from the first inside lug of the pickup selector to the outside lug of the volume pot.
- Next, join the hot wire from the input jack to the middle lug on the volume pot.
If you have gotten to this point without too much trouble great! We are already through the bulk of the work. So if you are happy with the result so far there's no reason you can't finish things off well.
Connecting the Tone Pots to the Pickup Selector
- Next cut another length of wire and join the second inside pickup selector lug to the middle lug on the middle tone pot.
- Next solder the third pickup selector lug to the last tone pot (the outside lug)
The Capacitor
The last thing we are going to do is attach the capacitor. As mentioned in our introduction to guitar wiring article the capacitor basically filters out the very high frequencies. In a nutshell the stronger the capacitor you use the less treble and your tone will be more bass-driven. For now, just use the capacitor that came with your kit, you can always upgrade or modify your electronics down the track know you have an understanding of guitar wiring.- Join the capacitor to the right side lug on the middle tone control and then join the other end to the same pot's case. Once completed then join the outside lug to the middle lug on the outside tone pot.
And that is basically it. Congratulations if you have followed along you have successfully wired up a Strat guitar kit!
Download Full-Size Strat® Wiring Diagram
Summary
The thing about guitar wiring is at first it can be intimidating and seem confusing but in reality, it's quite simple when broken into steps as we have above.
The great thing about having an understanding of guitar wiring is it allows you to make modifications down the track e.g. adding new pickup configuration or converting your Strat to a super strat (adding a humbucker to the bridge pickup).
I hope this article has been useful if you have any questions or are stuck on any part of the job please leave a comment below so others can see your questions and benefit from it as well.
