Free Shipping
on orders over $45*
on orders over $45*
DIY Kit guitars are notorious for requiring some adjustment before being ready to play. There are a number of things you will need to do prior to playing your new guitar including adjustments to the neck using the truss rod to reduce warping or bowing, adjusting the nut to set the action and setting the guitar's intonation.
The reason intonation is so crucial is because it has an impact on the notes and chords you play. For instance, if your intonation is out your guitar may sound fine on the lower frets but you could have trouble higher up the neck or vice versa, essentially the guitar won't be in tune with itself.
Hot Tip
Work your way from lowest string to highest. We do this because the lower string adjustment is going to have more of an impact on the guitar's intonation as it is a heavier gauge string. Adjusting the high E has minimal impact on the other strings intonation.
In a nutshell, you are going to be making adjustments to the length of your strings from the nut to where it touches the bridge. We are not talking massive adjustments here, just slight adjustments until the guitar's intonation is set up correctly. This should be one of the last steps in setting up your guitar as any neck adjustments you make can have an impact on the intonation. I prefer to adjust first and then again at the end of the guitar setup but you may prefer to just make the necessary adjustments as your last procedure.
Since you are reading this article on Guitar Kit World, I'm going to assume this is a new guitar kit and you won't need to head out and buy new strings. However, if you are reading this and picking up some pointers on adjusting the intonation of a guitar that has been up and running for a period of time you should really consider restringing before you proceed.
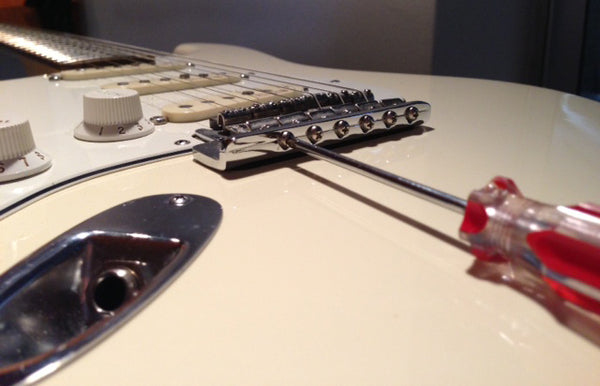
This is going to be different for every different style of guitar but the basics are very much the same. E.g. A Fender® Telecaster® may only have one screw for every two saddles. Where a Stratocaster® style guitar will typically have one for each and is easy to adjust with a screwdriver. A Les Paul®, on the other hand, has a slightly different configuration as the saddles actually sit in front of the bridge and a Floyd Rose style is different again and requires an Allen or Hex key as the saddle adjustment sits vertically. Either way, you should be able to get a pretty good handle on how things will work after inspecting your guitar's bridge carefully.
To properly check your intonation, select one string, to begin with. Generally, it is wise to start on your lowest string and work your way up.
Essentially if the plucked note is higher than the harmonic note you are going to need to adjust the saddle moving the saddle away from the nut e.g. increase the length of the string. If the note is lower you will be decreasing the length of the string away from the nut. You will need to adjust the saddle screw regardless of whether it is too high or too low. This is generally adjusted by using a screwdriver or Allen (Hex) key depending on the saddle adjustment your guitar incorporates. When you adjust the saddle screw make sure you make minor adjustments and then test. The time-consuming part of the process is you will need to re-tune before testing each time.
Recommended: Everything you ever wanted to know about Guitar Strings
If you think about it you are increasing (or decreasing) the length of the string so it makes sense that the string will need to be tuned again. To test simply tune your guitar to its harmonic note on the 12th fret and then pluck the string and check if the note is now in tune. If the note is flat you will need to shorten the string, if the note is too high you will need to lengthen. Remember small adjustments will make life easier here. Once you are confident you have set the intonation play a few chords and make sure things sound as they should.